Use it to extend the dormer roof to the main roof.
Revit split roof.
It s roof by extrusion there isn t any sketch lines to split into multiple segments.
This tool is located in the modify tab.
You can use the add split line tool to add linear edges and to split the existing face of a roof or structural floor into smaller sub regions.
To create a dormer model required walls and additional roof.
Download our free.
Select the floor to modify.
This is pretty easy to control.
Use join unjoin roof tool.
Click modify floors tab shape editing panel add split line.
For example when 4 non planar vertices become planar or when you manually create a split line.
Do not give any slope to your roof edges.
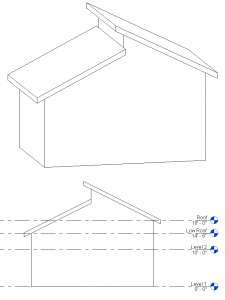
To create this kind of roof start by making two separate roofs.
This video is about framing roofs with timber and steel rafters in revit using agacad framing tools.
You will have to set the work plane to where you want to place the line.
You need to create the bay window roof separately.
Downloads below contain revit bim building information models in rfa file format that will work with 2009 autodesk revit software or a more recent version.
After you finish creating the roof select it.
Originally posted by mark b attach a model line locked to the edge of the roof you want to attach the fascia to then split the model line.
First activate add split line and draw the lines like below.
I noticed a post on the revit users forum on linkedin today and i thought i would create a quick reply.
Split roof in revit.
The original poster wanted to create a split roof.
You will see shape editing tools from in your ribbon contextual tab.
Select a vertex edge face or point anywhere on the structural floor to start the split line.
9 join roofs add opening to create dormer.
Quickly split an architectural roof into panels and then auto frame them.
Revit models are now available for lennox rooftop units and lennox vrf products.
Then follow these 2 steps.
This shape editing tools will not appear if you define the roof slope.